Sunday, June 10, 2012

Cheyanna - Fox Fairy Watercolor Painting - Step by Step Process

I thought it might be fun to make a new blog post every time I finish a painting to show my step by step progress photos in one easy to view place. I always post these as I'm painting on my Facebook Fan Page, but thought I'd share them in my blog as well! I'll give just a little description to try to explain my process as I'm painting. I hope that you all enjoy them!

This piece is Cheyanna, my fox and fairy painting. I painted this at the beginning of 2012. She is an 11x14" watercolor and ink painting. The original is still available for sale here! And you can also purchase prints and products of this image in my Etsy store here.

This is my initial sketch for Cheyanna. I always sketch everything out at first with good old paper and pencil!
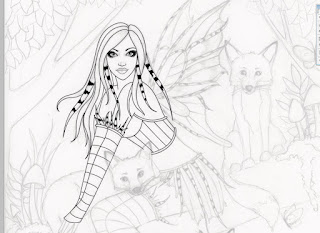
Next, I start to create the linework in Photoshop to create nice clean and crisp lines. I use these for the final watercolor painting, for rubber stamps and for my coloring pages that I sell.

I use the pen tool in Photoshop and generally start on the eyes and face first to make sure I get them correct.

More work on the fairy shown here without the sketch behind her.

Started on the leaves and the fox face. So many lines!
Completed linework for Cheyanna.

Now this is the actual watercolor painting. I printed the linework very lightly on the final watercolor and re-inked the entire piece with brown ink and a dip pen. Then I start painting in watercolors. I generally always start on the background first. Here, I used a napkin to blot out areas of color to create the look of foliage in the background without having to paint every little leaf or bush.

You can see that I often work on the same colors at the same time. For instance, I had the same colors of brown and gold in her clothing as I had in the leaves. So I work on them at the same time so that I don't have to mix all the same shades of color twice. It's a good time saver!

In the previous picture, you can see that I was painting and not worrying about blending much. I usually just paint the color gradually on the painting and then blend at the very end. I take a big soft brush dipped in water and use it to blend all of the paint that I've added. This is another time saver as well.
Here I'm starting on the red shades. They always look slightly pink when first getting started. It takes many layers to build up a nice deep red color.
Finishing up the red tones in this photo.

Starting on the trees in this photo. It's important to build up texture towards the beginning of the process. If you wait until you add too much color, you lose too much of the natural whiteness of the paper and it's nearly impossible to generate some sort of a texture without a lot of lifting or white acrylic.

Starting on the foxes and finishing up the trees. You can see I went really dark on some areas of the tree using black. I really like this look as it creates deep grooves and crevices in the tree.

Nearly done!

This is the completed piece!


Saturday, June 9, 2012

Kenda - Work in Progress - ACEO Painting

I was working on a surprise all Friday...meet Kenda my new ACEO painting! For those of you who aren't familiar with ACEOs, they are miniature pieces of art that measure 2.5x3.5". I actually started out painting ACEOs exclusively and didn't branch out into larger pieces for a few years. Now, it's flip flopped and I haven't painted an ACEO in a couple years, so I thought it was time that I painted one again. I left my paint brush next to the card so you could see just how tiny she is! This is a sketch that I drew a few months ago. I thought she would look really cute as an ACEO. She is being painted in very vibrant colors of pink, yellow/gold and purple.

Now, a question for you all. I will be offering these ACEOs up as auction style listings. I'm debating between using eBay or creating Facebook auctions. What do you all prefer?

I plan on making many more ACEOs. These may or may not be turned into full paintings one day. But, another surprise, I have decided to use these ACEO pieces to launch a new set of images available for commercial use!! This is something that has been asked of me frequently, so I'm so excited to finally offer my art to you for light, handmade commercial use directly from me. I will be offering printable digital stamps and also printable colored graphics for use in card making, scrapbooking, jewelry making and any other handmade crafts. And the best part is, you will be able to sell your finished creations! I will be sure to let you all know more details as I figure everything out. =)


Serafina & Firenze - Work in Progress

I just wanted to show a step by step process so far of my Serafina & Firenze piece! This is a commission that I'm working on for a client who wanted me to draw a fire witch. Eventually, we are going to do all of the elements. We are going to feature each witch with their familiar. The fire witch has a phoenix of course! It should make for a very fun series!

I am fairly far along in the painting process so far and hopefully only have a few sittings on this painting left. If you want to stay up to date with all my work in progress photos, be sure to join my Facebook Fan Page! I post frequently there, almost daily, with updates as to what I'm working on.

Below are photos from the sketch stage to the stage where I'm at now for Serafina & Firenze.

Initial sketch - Made a few changes from the very original sketch. You can see some parts have been pieced together to create a finished drawing. Sometimes this is necessary, especially when working on a commissioned piece.
I'm starting the linework in Photoshop. I create all my lines in Photoshop to make them crisp and smooth. I use these lines on my final watercolor paper and for my coloring pages that I sell.


Finished the lines in Photoshop for Serafina.

Working on the lines in Photoshop for Firenze.


Finished linework in Photoshop.

Here is where I print the lines very lightly on my final watercolor paper. I then re-ink the lines with a dip pen and brown ink. You can see that the lines are only partially done in this photo.
Started on the background. I used salt to create a nice textured finish for the stone.

After I get the background partially finished, I move onto the witch. I don't want to make the background too dark or over work it. So I like to work on the darker parts of the foreground first to make sure everything will work well together.

Painting stripes is so fun! I usually start on the striped tights, because they're my favorite to paint.

I also love to paint fabric!

In this photo, I have finished the darkest parts of the foreground. The rest of the white parts will either be the same colors I have going on now or will be lighter. So I feel confident that I can go back to the background and finish that up. I like to work dark to light when using watercolors. That way if I get any dark colors on the areas that are supposed to be light, I can easily lift them out with some water and a napkin without messing up any painting that I've done.

Working on the brick work.

Here I've begun to add shading and aging effects to the columns and carvings. I decided to literally drip water and pigment to make the columns look nice and aged.

My client wanted the carvings to look gilded. All of the elements will share the same background, so we decided we wanted it to look like a regal meeting place that is hundreds of years old! So that's why we went with the gold/aged look. Gold is always a tricky color to create without metallic paints. Here, I used a bright yellow as a first coat and followed up with a dark orange/brown color that I painted on and used a napkin to sponge off some of the color. It's a little difficult to see in this photo, but it created a nice effect!

Cheyanna - Original Fairy Watercolor Painting For Sale

After having my painting, Cheyanna, in my personal collection for awhile, I decided it was time she found a new home! I will list all of the details below. You can purchase her from my Etsy shop here or you can send me an email to nikki@aurella-art.com. I am asking $350 plus shipping for her. I also offer payment plans as well. Thank you so much for your interest in my artwork!


Title: Cheyanna
Size: 11x14" (cut to exact size)
Media: Watercolor and Ink
Date: 2012

This is my new ORIGINAL 11x14" watercolor painting, Cheyanna. Cheyanna is a fairy that has grown up in the forest with her fox friends. In this painting, I have captured her in one of her favorite places. She is most at home among her fox friends in the changing autumn trees enjoying the brisk fall breezes.

Cheyanna is painted in vibrant shades of red, orange, yellow and brown. Her environment is decorated with fall leaves, mushrooms and moths. With her on the trees are four foxes. Cheyanna is wearing striped brown tights and has gorgeous wings that almost mimic an autumn leaf. I hope that you enjoy her and will consider adding her to your collection.

She is painted on an 11x14" piece of hot press watercolor paper. Cheyanna is signed, titled and dated on the back. She will come shipped to you safe and sound in a sturdy box.

Please note: Colors may vary from monitor to monitor, but every precaution has been taken to make the image as close to the original as possible. Watermarks do not appear on the painting.

Cheyanna is also featured on prints, magnets, stickers, pocket mirrors and more in my shop! Click on this link to see all of the options.

Visit my Etsy shop here.

For more of my original paintings, visit this link.


Thursday, May 24, 2012

Weekly Special - Mystery Print Grab Bag!

From Tuesday 5/22/12 - Monday 5/28/12 I am offering a mystery print grab bag including 5 random 5x7" prints and 5 random ACEO prints for only 20!!

******************

The retail value of this set is $60, so that's a huge savings of $40!

With this weekly special, you will receive 5 random 5x7" prints that are packaged with a backing board and a clear plastic sleeve. You will also receive 5 random ACEO prints that measure 2.5x3.5" and are packaged in a clear plastic sleeve. I will make sure to include 10 unique images, so you will not get any duplicates!

I will be picking from a selection of over 70 different images, so this picture only shows a small sampling of the images that I will be picking from. Your print selection will be completely random and may or may not include some of these images. It will definitely be a fun surprise when you receive the package!

I will of course be happy to sign any prints upon request! Just let me know in your order that you would like them signed. =)

All you need to do to purchase this weekly special is send me an email to nikki@aurella-art.com and let me know what you'd like to buy! I'll then send you an invoice directly through Paypal to your email address for an easy and safe purchase. Once I receive the payment, I will package everything up and ship them off to you. There will be a shipping charge added to each order. The charges will be as follows:

United States: $3.75
Canada: $4.75
Everywhere Else: $9.00

**Please note that this special is not being offered through my website store or my Etsy store. Though I will happily combine shipping with any orders purchased through my Etsy shop or website store. Just message me if you have any questions. =)


Friday, May 18, 2012

Portrait of a Steampunk #3 - Naming Contest!

I have a new sketch to share with you all today! I had a lot of fun sketching this steampunk piece. She will be part of my Portrait Series where I showcase my girls in a more close up pose with a simplistic color scheme and background. This will be my third Steampunk in the series. And she's looking for a name!

Think you have a name that would be perfect for her? Well, I'd love for you to post your suggestions below! I've allowed anonymous posts, so even if you don't have an account, just post your suggestion below. When posting a name, please also put your email address so that I can get in contact with you if you win! The winner will receive a 5x7" print of the finished piece.

I hope you all enjoy this sketch! I'm already working on the linework for her. You can watch the whole piece evolve on my Facebook Fan Page here.


Thursday, May 3, 2012

Winner of Naming Contest - Fire Witch Painting

Well, after much thought on all the fabulous names suggested, I have come to a decision about the names for my new Fire Witch painting. And the winner is....Heather Savino! Her suggestion that I chose is Serafina for the witch and Firenze for the phoenix. So the full name of the piece will be Serafina and Firenze. Heather will win a 5x7" print of the finished piece.

When choosing the name, I was looking for a clear distinction between the witch name and the phoenix name. I think it's pretty easy to determine which name goes with the witch and which name goes with the phoenix. Serafina sounds like such a pretty witch name, especially one with fire abilities. Heather also found that it means burning one, which is pretty neat! I also loved the name of Firenze for the phoenix. It just sounds like a powerful name for such a magical creature.

All of the names were of course fabulous! I really appreciate all the time and effort you all put into the names by researching the different meanings. It means so much to me and thank you for participating! I have lots of naming contests, so there will be plenty of other chances to win. Thanks again! =)